Mummy Halloween Cherry Hand Pies
*This post may contain affiliate links. See our affiliate policy here.
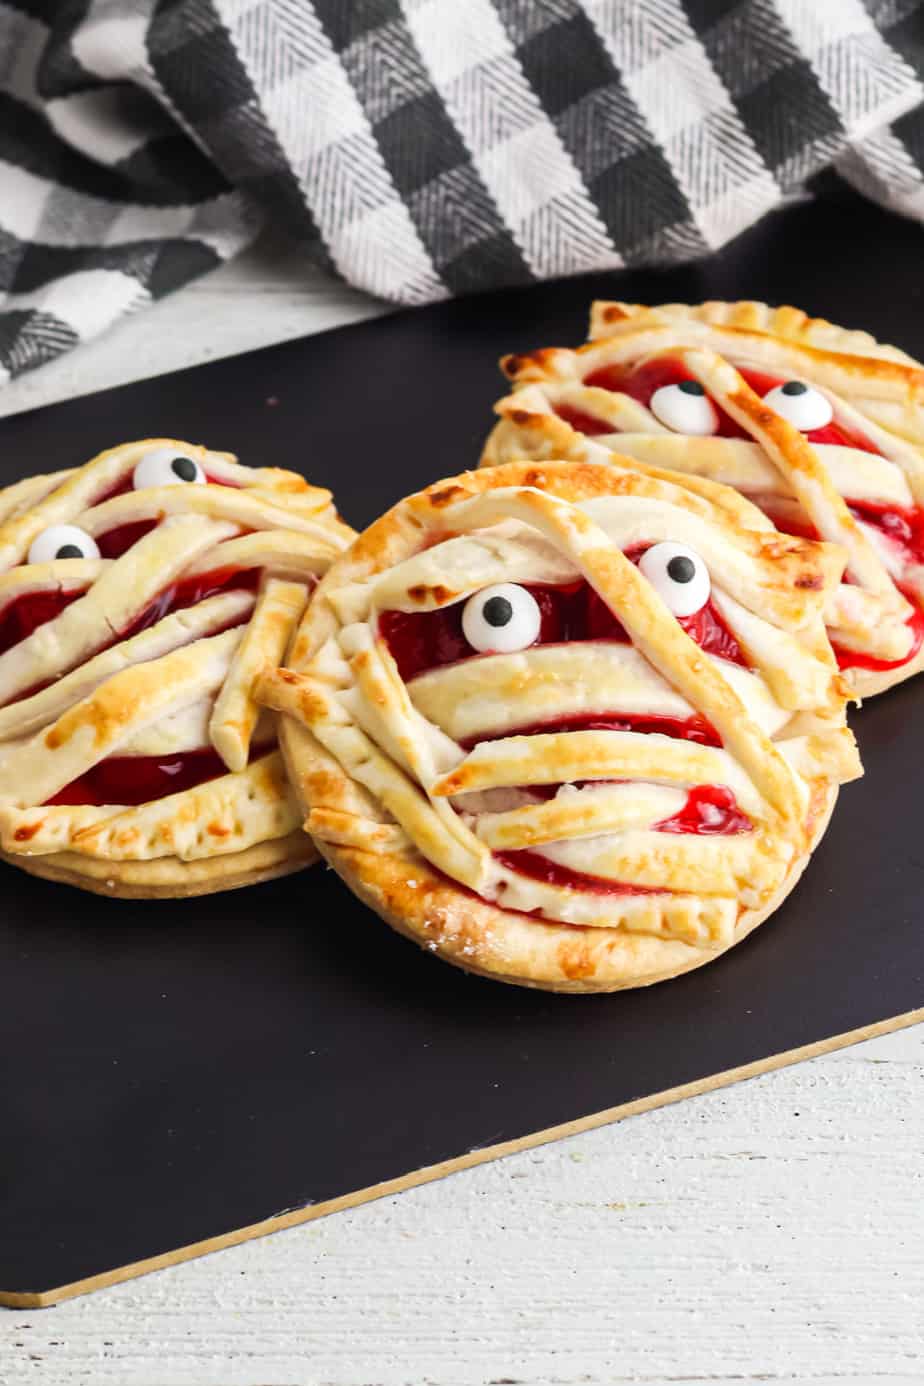
These adorable mummy cherry pies are the perfect spooky Halloween dessert! This ghoulish recipe is perfect for a Halloween party snack board or just as a special sweet treat for the family.
This year I don’t think anyone knows what to expect for Halloween. I’m not sure if we will Trick or Treat or do some of our other normal traditions. But I do know I want to make Halloween fun for my family.
One way to add a little extra fun is to make a spooky treat, and these Mummy Cherry Pies check all the right boxes. Fast, easy, and the perfect mix of semi-homemade and spooky fun mummy recipe.
You can also make these adorable mummy hand pies as a treat for a party. (If you need even more quick ideas, try this GIANT list of 43 Easy No Bake Halloween Party Desserts! Or try more quick and easy mummy desserts with Spooky Mini Chocolate Mummy Cookies or No Bake Mummy Nutter Butters.
Table of Contents
How Do You Make Halloween Mummy Hand Pies?
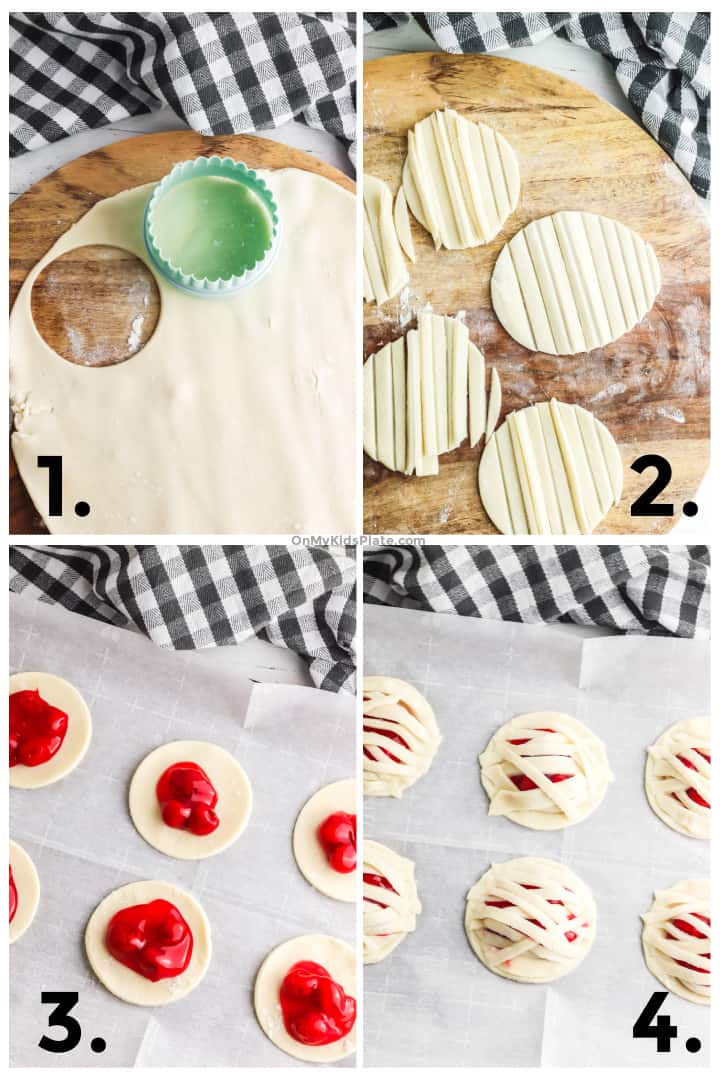
Find the full printable recipe with specific measurements and directions below in the recipe card.
- Let the pie dough defrost according to the package.
- Unroll the pie dough and cut 7-8 circles out of each piece of dough with the cookie cutter.
- Put 8 circles to the side. Use a pizza cutter to cut the rest of the circles into thin strips.
- Fill the pies with a tablespoon of filling. Brush the beaten egg around the edge of the pie crust. Then lay long strips of pie crust across the top of your hand pies.
- Brush the tops of each mummy hand pie with the beaten egg. Then bake! Add the eyes after the pies cool completely so they don’t melt.
The trick to making the mummy bandages fast and thin is to use a pizza cutter. It helps you to make quick thin strips fast and easy.
If you don’t have a pizza cutter though, you can use a knife to cut the pie dough into strips.

How To Make Fresh Cherry Hand Pie Filling
You can use fresh or frozen cherries and make your own fresh cherry pie filling, it’s really easy.
Ingredients For Fresh Cherry Hand Pie Filling
- 2 teaspoons cornstarch
- 4 teaspoons water
- 2 cups cherries without pits
- 1/4 cup sugar
- 1 tablespoon lemon juice
- Pinch of salt
Instructions for Fresh Cherry Pie Filling
- Mix together the cornstarch and water in a small bowl, blending well.
- Add the cherries, sugar and lemon to a pan on the stove. Mix with a silicone spatula over medium heat. Cook for 6-7 minutes, stirring frequently.
- Give the cornstarch another good stir then add to the cherries. Cook for an additional minute, then remove the pan from the heat. Let it cool for a few minutes to thicken, then it’s ready to go!
I prefer using frozen cherries for hand pies, because it’s faster while still tasting fresh. I also don’t have to remove the pits!
If you are using fresh cherries try using a straw to remove the pits. You can also buy a cherry pitter that makes the job faster, I have this one that I love and can be a great job to hand off to my kid. It’s also handy to have to pit olives.
What Other Flavors Can I Try For This Mummy Recipe?
If you have jam, you can fill these little pies with jam. You can also use strawberries or raspberries for the same spooky red filling. Blueberries or blackberries would also make a delicious mummy hand pie too (but wouldn’t have the red spooky blood effect, it will be a darker color which is still fun for Halloween).
You can also make the pies savory by filling them full of pizza toppings, and the Halloween breadsticks shaped like bones would go great with a savory mummy pie.
If you love pies, but don’t mind a few shortcuts try the Easy Blueberry Galettes which are mini open-faced pies.
What If I Don’t Have a 3-inch cookie cutter?
If you have a glass that is about 3 inches across, you can use it to cut the circles.
You can also make these a little smaller or bigger if you have a round cookie cutter that’s a different size. Your baking time might be a little more or less though depending on the size you make your mummies. I wouldn’t go too much smaller though because you’ll run out of room for the filling, cherries are a bit larger bite of fruit.


Mummy Cherry Hand Pies
Equipment
- 3 inch cookie cutter
- Pizza cutter
- Baking sheet
- Oven
- Pot
- Measuring cups and spoons
- Small bowl
- Silicone brush
Ingredients
- 2 9 inch sheets Pie dough I used the refridgerated kind that includes two 9 inch crusts. You can also use your favorite pie dough mix or make your own homemade crust.
- 16 candy eyes
- 1 Cup Cherry pie filling
- 1 large egg
Instructions
- Preheat oven to 375 degrees. Line a baking sheet with parchment paper.
- Use a 3-inch cookie cutter, cut 7-8 circles out of each piece of pie dough, saving the dough scraps to the side. Place eight of the circles on a baking sheet lined with parchment paper.
- Using a pizza cutter, slice the remaining pie dough circles into thin strips that will become the mummy's bandages.
- Beat the egg in a small bowl with a fork.
- Place a spoonful of cherry pie filling in the middle of each circle on the parchment paper. Leave a little room around the outside of each pie filling to attach the bandages. Brush the edge of each pie crust circle with a silicone brush and the beaten egg so the bandages will stick to the bottom circle.
- Top the pie filling with the mummy bandages, pressing the bandages together with the bottom crust using your fingers. If you need more bandages, cut extra from the leftover scraps of dough.
- Brush the tops of the mummy hand pies with the egg and a silicone brush to help the pies brown.
- Bake for 8-10 minutes. Watch carefully through the oven door, the crust will start to turn a golden brown color. Let the pies cool comepletly, then add the eyes and enjoy!
Video
Notes
Sprinkling a little coarse sugar on the tops of the pies before they go in the oven gives these hand pies a nice crunchy top with a little bit of sweet that is delicious. You don’t have to add this, but a little sprinkle of sugar is extra delicious.
You can sprinkle a little powder sugar over these hand pies. Let them cool completely or the powdered sugar will melt off of them. Sprinkle powdered sugar through a fine-mesh sieve, then wipe with a clean towel on the candy eyes. This makes these hand pies look even more like mummies! This technique is also a bit messier though to eat, but is delicious!
Optional- Here’s how to make the cherry pie filling from fresh or frozen cherries.
INGREDIENTS FOR FRESH CHERRY HAND PIE FILLING
- 2 teaspoons cornstarch
- 4 teaspoons water
- 2 cups cherries without pits
- 1/4 cup sugar
- 1 tablespoon lemon juice
- Pinch of salt
INSTRUCTIONS FOR FRESH CHERRY PIE FILLING
- Mix together the cornstarch and water in a small bowl, blending well.
- Add the cherries, sugar and lemon to a pan on the stove. Mix with a silicone spatula over medium heat. Cook for 6-7 minutes, stirring frequently.
- Give the cornstarch another good stir then add to the cherries. Cook for an additional minute, then remove the pan from the heat. Let it cool for a few minutes to thicken, then it’s ready to go!
Nutrition
Did You Make This?
I would love to see it! Share your thoughts with me in the comments below!


